Documentation
Quick Start
Open your project folder or repository, choose a scan mode, review strings, translate, and inject safely into your source code.
Step 1: Load Project
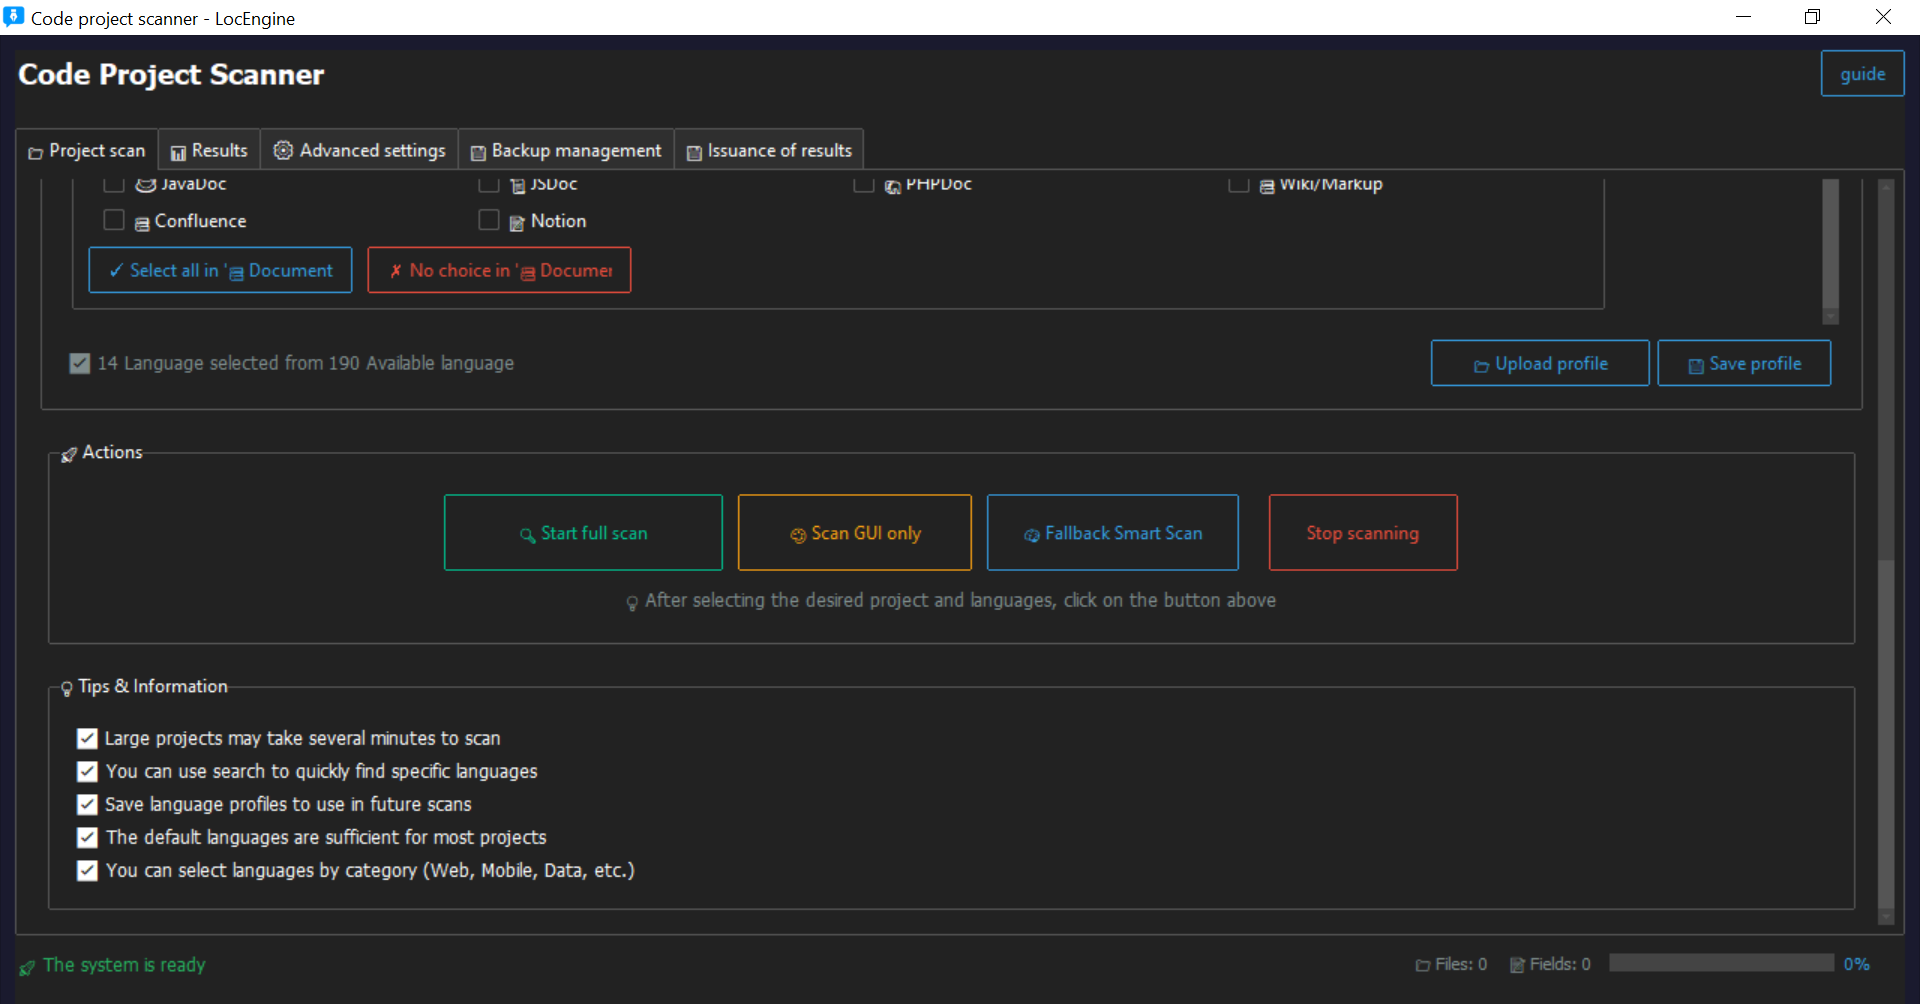
Step 2: Choose Scan Mode (Full / GUI / Fallback)
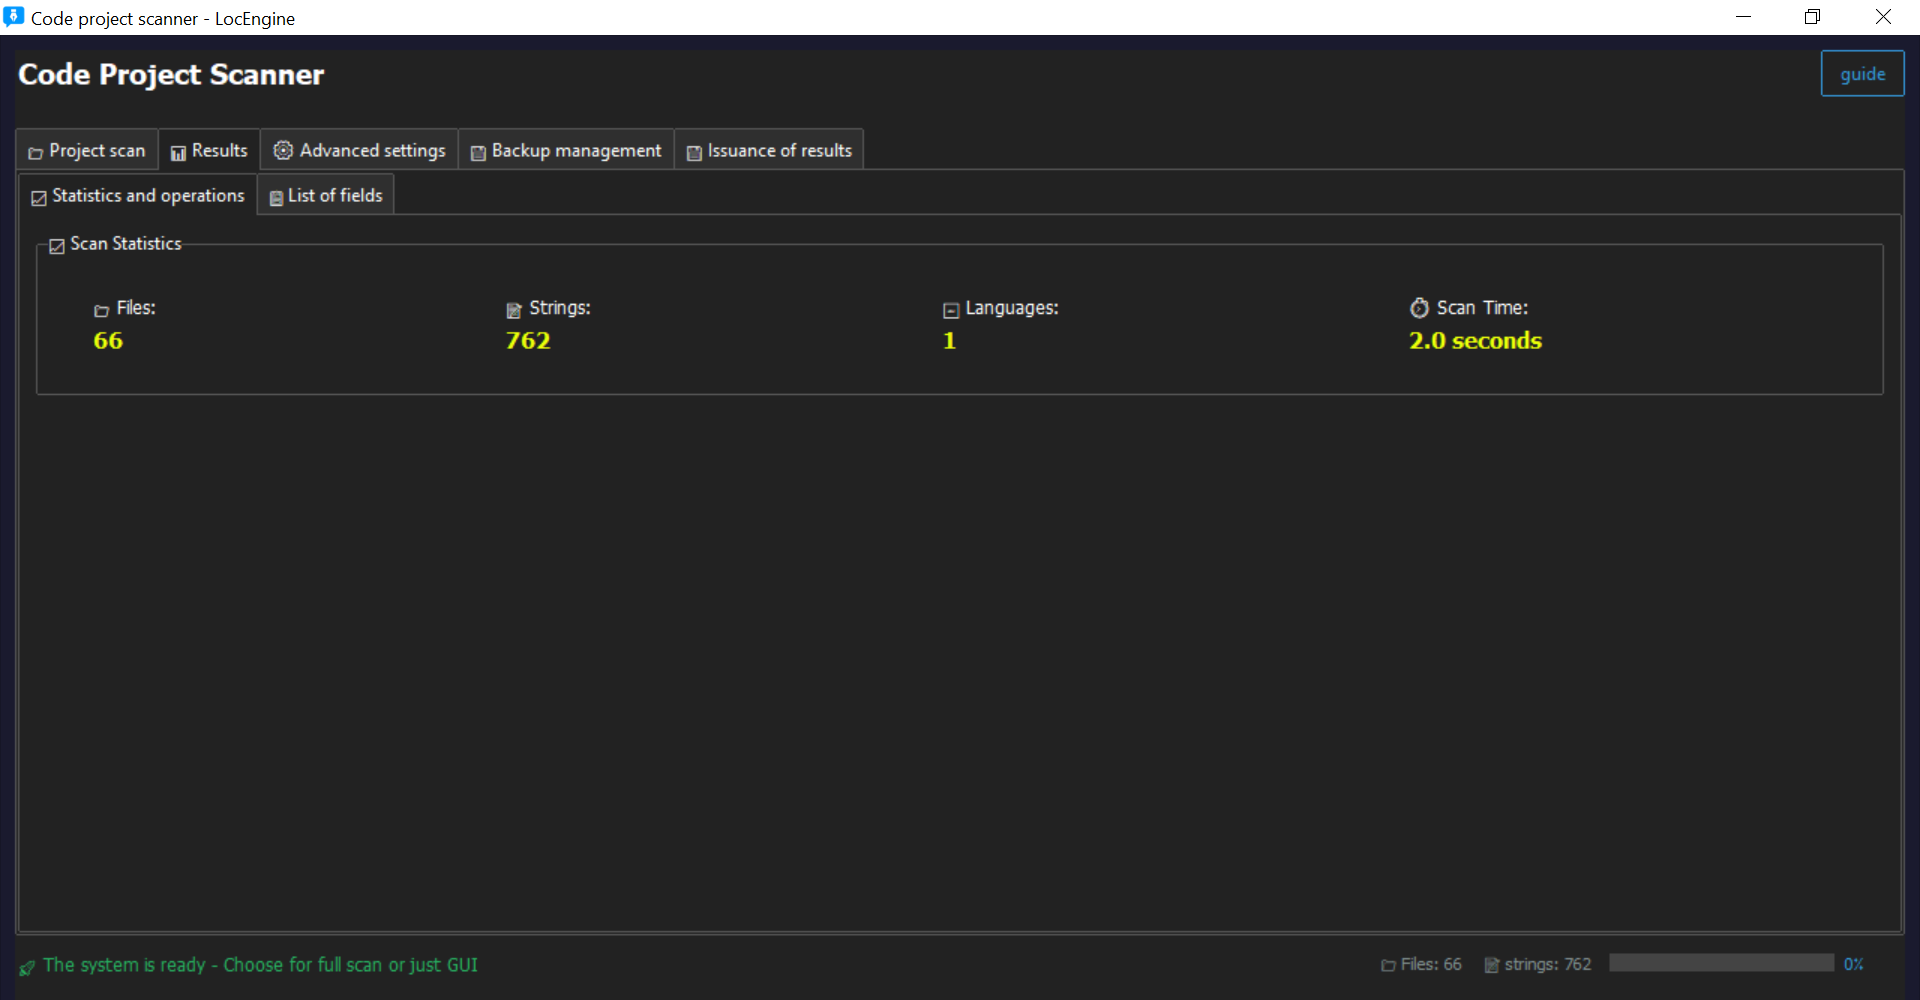
Step 3: Review Strings
Step 4: Translate (Machine / Manual)
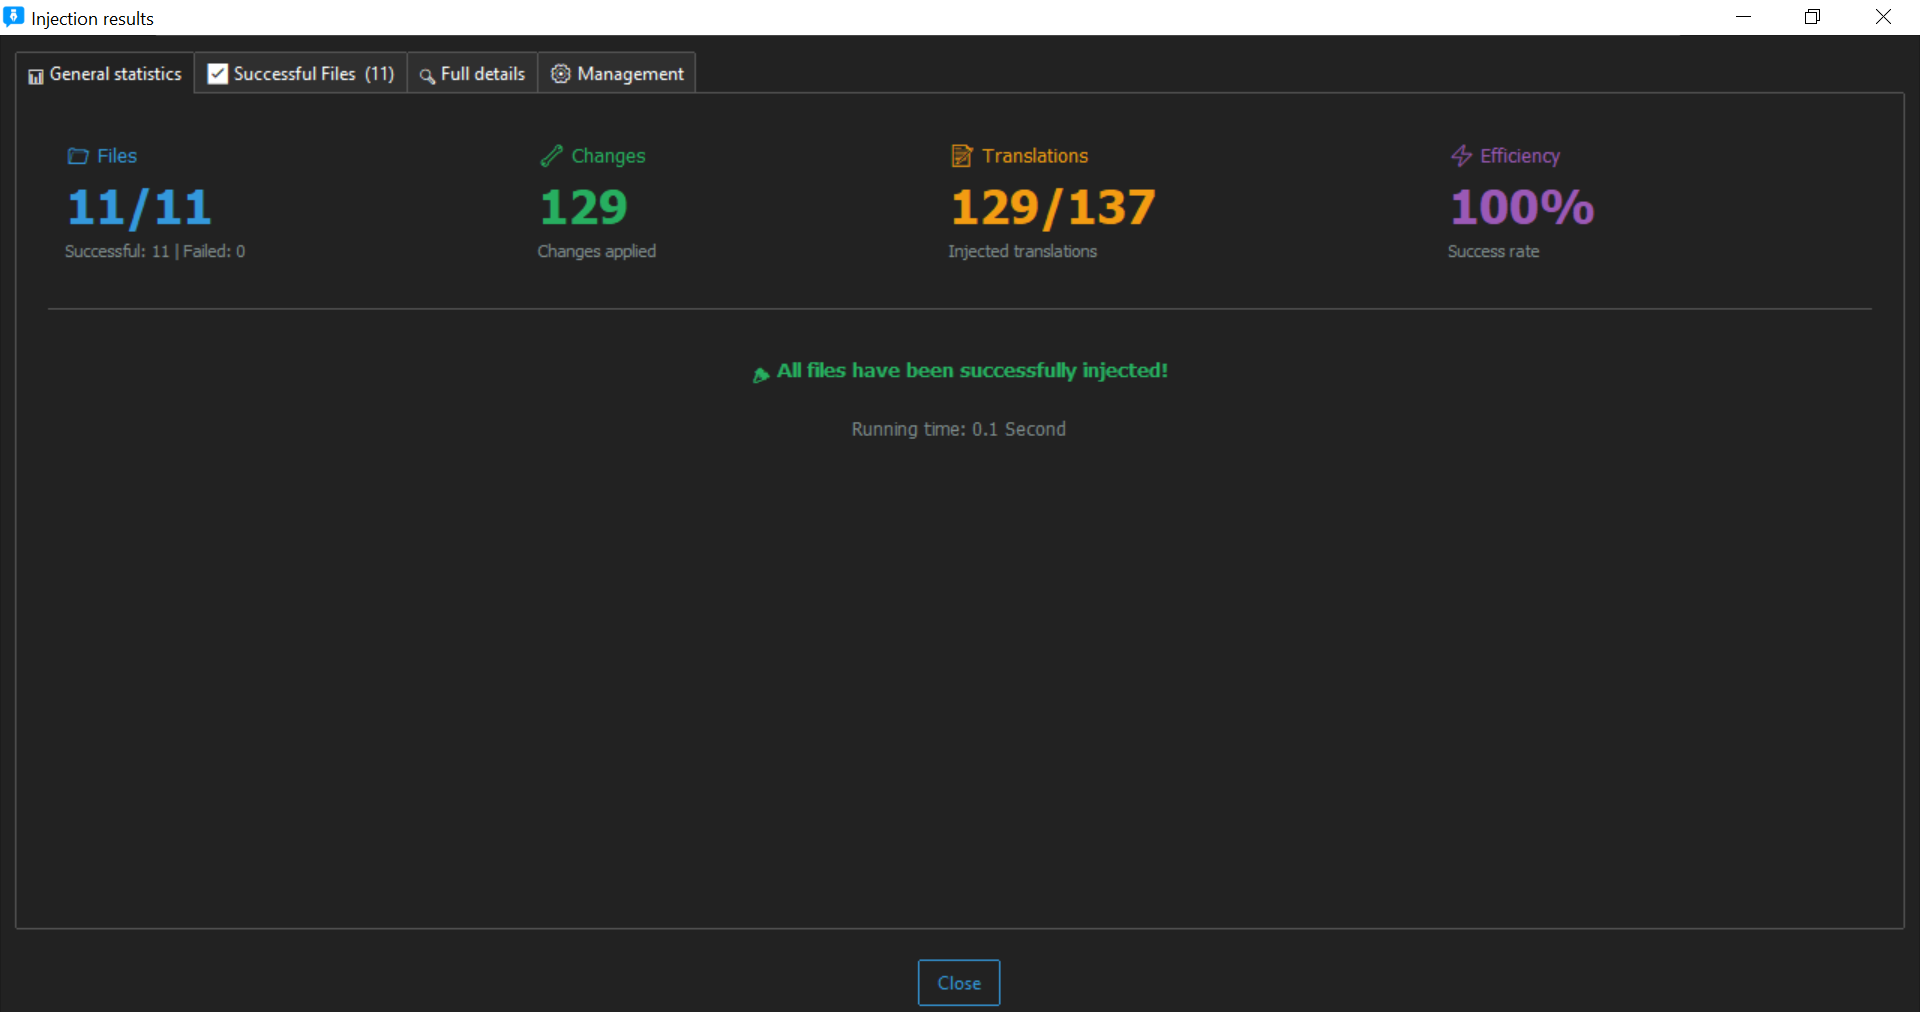
Step 5: Safe Injection
Scanning Engine
Multi-layer detection using Regex, AST, and Fallback. Works for both i18n and non-i18n projects.
- Full Scan: Complete project analysis
- GUI Scan: Visual detection
- Fallback Scan: Non-i18n environments
Translation System
Supports machine translation and manual editing. Export in JSON, PO, CSV, TXT formats.
- One-click translation
- Translation memory ready
- Offline manual translation supported
Safe Injection
Reversible code injection ensures your project stays safe.
- Automatic backup before injection
- Encoding-safe
- Production-ready workflow
i18n Generation Engine
Automatic key generation for projects without i18n support. Framework-agnostic and migration-ready.
- Key extraction from source code
- Automatic structure creation
- Migration-ready output
QA System
Automated QA validation ensures translation integrity.
- Placeholders, punctuation, whitespace
- Length, numbers, capitalization
- Encoding, RTL/LTR, glossary, consistency
🧠 Translation Cache & Memory
Never translate the same string twice. LocEngine's intelligent caching system stores translations for instant reuse, saving time and API costs.
Overview
The Translation Cache automatically stores every string you translate. When the same text appears again, LocEngine delivers the cached translation instantly - no API calls, no waiting.
Smart Cache
Automatically stores translations locally for instant reuse across projects.
- Instant delivery of repeated strings
- No additional API costs
- Persistent across sessions
- Export/import capability
Translation Memory
Fuzzy matching finds similar strings (90%+ similarity) and suggests translations.
- Catches near-duplicate strings
- Context-aware suggestions
- Team-shared memory (Pro+)
- Version history tracking
Performance Boost
Reduce translation time by up to 70% with intelligent caching.
- 70% faster project turnaround
- 60% reduction in API costs
- Offline access to cached translations
- Consistent terminology
How It Works
First Translation
String is translated via machine or manually. Result is automatically cached with metadata (language pair, context).
Cache Storage
Translation stored locally in .locengine/cache/ directory. Organized by project and language.
Smart Detection
When same/exact string appears, LocEngine checks cache first before calling translation APIs.
Instant Delivery
Translation delivered instantly with zero delay or cost. Cache hit rate typically 70-85%.
Managing Cache
You can manage your translation cache through Settings → Translation:
Best Practices
- Export regularly: Backup your cache when working on critical projects
- Team sharing: Share cache files with team members for consistency
- Monitor hit rate: Check cache performance in Statistics panel
- Prune rarely used: Auto-cleanup removes unused entries after 90 days
Performance Impact
Real-world results from production use:
- 85% cache hit rate on large projects
- 70% reduction in translation time
- 60% decrease in API costs
- Zero latency for cached translations
Troubleshooting
Q: Cache not working?
A: Check that cache is enabled in Settings and you have available space for your plan.
Q: Can I move cache to another computer?
A: Yes! Export cache from old computer and import on new one. Works across all installations.
Q: Cache corrupted?
A: LocEngine automatically validates cache integrity. If issues persist, clear and rebuild cache.
WordPress Localization Module
Automatic translation for themes and plugins. Generates PO/POT/MO files with one click.
Large Project Support
Tested on projects exceeding 200,000 strings. Optimized for enterprise and multi-module repositories.
📥 Installation Guide
Download and install LocEngine on Windows in minutes.
System Requirements
- ✅ Windows 10 or 11 (64-bit)
- ✅ 4GB RAM minimum (8GB recommended for large projects)
- ✅ 500MB free disk space
- ✅ Python 3.8+ (optional, for advanced scripting)
Step-by-Step Installation
- Download the latest version from your account dashboard
- Run the installer (
LocEngine-Setup.exe) - Follow the installation wizard (click "Next" through the steps)
- Launch LocEngine from desktop shortcut or Start Menu
First Launch
When you first open LocEngine, you'll see the license activation screen. You can:
- 🔑 Enter your license key (if you have one)
- 🆓 Continue with Free mode to test the app
🔐 License Management
How to activate, switch, and manage your licenses effectively.
Activation Process
- Open LocEngine and click "Activate License" button
- Paste your license key from your account dashboard
- Click "Activate" - validation happens instantly
- The app restarts automatically with full features enabled
Switching Between Multiple Licenses
If you have several active licenses (e.g., BASIC for personal use and PRO for work):
- Go to the License tab in the app
- Click the dropdown menu showing your current license
- Select the license you want to use from the list
- The interface updates immediately with the new license features
License Plans Comparison
| Feature | Free | BASIC | PRO | ENTERPRISE |
|---|---|---|---|---|
| Max Strings | 1,000 | 10,000 | 100,000 | Unlimited |
| Team Members | 1 | 5 | 20 | Unlimited |
| Export Formats | JSON | JSON, CSV | JSON, CSV, YAML | All + Custom |
| Private Projects | 1 | 10 | 50 | Unlimited |
| Priority Support | ✗ | ✗ | ✓ | ✓ 24/7 |
🔧 Troubleshooting
Solutions to common issues you might encounter.
🚫 App won't start after installation
Try these solutions in order:
- ✅ Run as administrator: Right-click on LocEngine icon → "Run as administrator"
- ✅ Check antivirus: Temporarily disable antivirus or add LocEngine to exceptions
- ✅ Install Python: Download and install Python 3.8 or higher from python.org
- ✅ Reinstall: Uninstall completely, restart PC, and install again
If none of these work, please contact support with your system details.
🔍 Scanner not detecting all strings
Common reasons and fixes:
- Wrong project type: Make sure you selected the correct framework (Android/iOS/Flutter) in scan settings
- Nested folders: Enable "Deep scan" option to scan subdirectories recursively
- Custom syntax: Add custom regex patterns in Advanced Settings → Exeptions for project-specific syntax
- File permissions: Run LocEngine as administrator to access protected files
- Large files: Increase timeout in Settings for very large files (100,000+ lines)
❌ License validation fails
Possible causes and solutions:
- 🌐 Internet connection: Check your internet connection and firewall settings
- 🔑 Incorrect key: Verify the license key is correct (copy-paste carefully, no extra spaces)
- 💻 HWID mismatch: This happens after hardware changes (new CPU/motherboard). Contact support to reset your license
- 🛡️ Firewall blocking: Add LocEngine to firewall exceptions (ports 80 and 443)
- ⏰ Expired license: Check if your license hasn't expired in Account Dashboard
🔄 Injection failed or corrupted files
Don't panic! LocEngine creates automatic backups:
- 📁 Find backups: Look in your project folder for
.locengine-backupdirectory - ⏰ Restore: Copy the original files from backup folder and replace the modified ones
- 🔧 Prevention: Always run a test injection on a small sample first
- 📝 Encoding issues: Make sure your files are UTF-8 encoded
🐌 App is slow or freezing
Performance optimization tips:
- 📦 Reduce scope: Scan specific folders instead of entire drive
- ⚡ Close other apps: Free up RAM by closing unnecessary applications
- 🔄 Update: Make sure you're using the latest version
- 💾 Disk space: Ensure you have enough free disk space (at least 1GB)
- 🔍 Exclude folders: Add node_modules, vendor, and other large directories to exclusion list
✨ Best Practices
Pro tips to get the most out of LocEngine.
🔐 Before Scanning
- Always backup your project - LocEngine does this automatically, but an extra backup doesn't hurt
- Start small - Test on a small project or sample folder first to understand the workflow
- Review scan settings - Configure file extensions and patterns for your specific framework
- Version control - Commit your project to Git before starting for easy rollback
📝 During Translation
- Use QA validation - Always run QA checks before injecting translations
- Check placeholders - Ensure %s, {0}, and other placeholders are preserved in translations
- Test RTL languages - If translating to Arabic, Hebrew, or other RTL languages, test separately
- Glossary enforcement - Create a glossary for technical terms to maintain consistency
- Review machine translations - Machine translation is great, but human review catches nuances
🚀 After Injection
- Build and test - Compile your project and test thoroughly in all target languages
- Keep backups - Don't delete backups until you've verified everything works
- Document changes - Note which files were modified for team members
- Monitor performance - Check if the localization affects app performance
- Update translation memory - Save approved translations for future use
👥 Team Collaboration
- Use private projects - Keep each client's work separate with private projects
- Assign roles - Give team members appropriate permissions (Admin, Editor, Viewer)
- Track changes - Review activity logs to see who modified what
- Share glossary - Maintain a shared glossary for team-wide consistency
- Regular sync - Pull latest changes before starting new work
⚡ Performance Optimization
- Exclude generated folders - Skip node_modules, vendor, build, and dist directories
- Use incremental scanning - Scan only changed files for faster processing
- Batch similar projects - Process multiple similar projects together
- Schedule scans - Run large scans during off-hours
Master i18n with LocEngine
Learn how to scan projects, generate keys, export translations, and safely inject i18n into your codebase. Complete guide with examples and best practices.
Read Complete i18n Guide →